
If emails are important part of your work and life, it is wise to alert yourself whenever a new email arrives. Certain devices automatically do that for you now, but you can also customize them according to your needs. Outlook also alerts you when a new email arrives, especially in combination with Windows 10.
Alerts in Outlook Windows
Creating your own alerts can help you stay at top of the things and always informed in real time about the new information. In the age of 24 x 7 connectivity, you wouldn’t want to check the new emails from your boss only when you sign in or open Outlook. You would want to be alerted by the software itself whenever it happens. Moreover, it would be nice to have a different alert settings for new emails from your boss, from your co-workers, and different alerts together for personal emails.
Luckily, you can do all that and even more with Outlook. You can even specify a set of criteria, which needs to be met for the alert/notification.
This article will show you how you can do that in Outlook Windows.
Alerts work the same way as ‘Rules’ in Outlook. We have discussed previously in this blog about setting rules. A ‘rule’ in Outlook is when you specify the actions to be taken on emails that meet the specific criteria or conditions. For example, move all emails that contains the word “revenue” in subject line to the folder “Business.” An alert works the same way, except with an ‘alert,’ the action that you want to set is that of “show an alert” or “play a sound” or both.
Note: Outlook also has a separate group of settings for managing alerts from an Office compatible alert source such as SharePoint server. But this article is not about that.
How to create alerts in Outlook (Microsoft Office)?
First of all, if you want a notification or alert for all the new emails for all the inboxes in Outlook, you can apply those by going into options.
- Open Outlook > File > Options
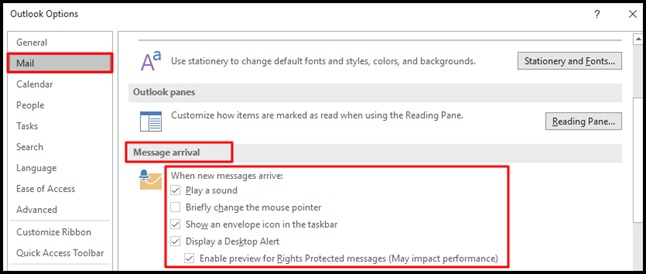
- Go to ‘Mail’ tab and then to “Message Arrival” section
- Enable the options by checking the box
- Play a sound
- Briefly change the mouse pointer
- Show an envelope in the taskbar
- Display desktop alert
These are universal settings for Outlook Mail that are applied to all new messages.
Now, we will see how to create customized alert only for emails that fulfil a certain criteria or meet certain conditions.
There are also two ways to do that:
- In the “home” tab of the top ribbon, go to Rules > manage rules and alerts > New rule . Here, you can create a new rule from scratch, specify the conditions, and set “display alert text in the new item alert window.
- Or, you can select an email, then in the ‘Home’ tab, go to Rules > and then select “Create Rule.” Or, right-click the email and go to Rules > Create Rule.
What’s the difference between the two?
The first one will let you create a new rule from the scratch, but the second one (in which you directly select create rule after selecting the email) will automatically create the criteria for the rule based on the email that was selected. It will pick up the email address from which the email was sent, the subject line of the email, and your own address to which it was sent to. This makes it easier to create a rule/alert for the similar emails in the future. All you have to do is simply check the box to set those criteria.

After setting the conditions, check the boxes for alerts: display a new alert window and play a sound. To make better use of alerts and notifications for new emails in Outlook, we suggest using a different custom-text for the “new item alert” window and possibly a different sound.
Advance Options
If you want more settings, click on “Advanced Options” and you will taken to the main “rules and alerts” customizing window with all the available actions and conditions you can specify, as shown in the screenshot below:
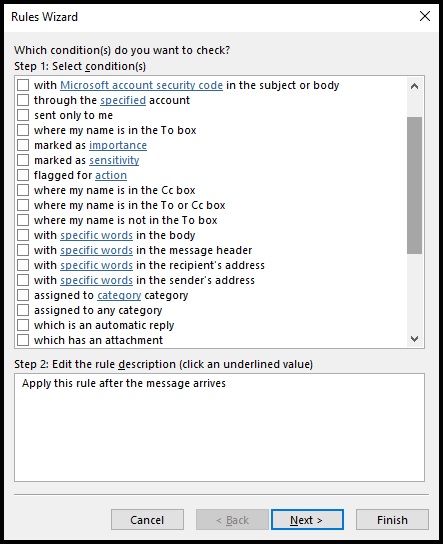
Here, you can specify and narrow the criteria even further. Some users like to create very specific types of rules and alerts, and this settings is for them.
Once the conditions have been specified, click “Next” and specify the actions, which are in this case, to create alerts and notifications. There are few “actions” related to alerts: play a sound, Display a specific message in the new item alert window, and display a desktop alert. “Displaying a desktop alert” is only for Outlook 2016 and newer versions. It won’t work in the previous version.
When you check these options, they will show up below under “step 2” category with an underlined-link that you can click on to customize further.

For example, for the sound, when clicked on the link “sound,” you can choose any file from local PC as the alert sound to play when the new message arrives. Similarly, click on the underlined-link “a specific message” to type your own customized message that will show in the new item alert window.
When all is done, click “Next” to go to the next phase, which is to specify any exception.

For instance, if you do not want an alert for a couple of days, you can select the exception “except if received in a specific date span.” Then, click the underlined-link below to set the value or range of dates you want as exception. Here, again, you get a lot of options to specify the exception to the rule. Whenever you feel like you don’t want the alert, you can specify those conditions here.
When that’s finished, click “next” to go to the final screen of setting up rules and alerts.

- Give the alert (rule) a name, which will make it easier to modify it afterwards
- Check if you want to immediately turn on the rule
- Check if you wan to run the alert (rule) already received messages
- Click “Finish.”
Congratulations, you have set alerts when receiving new and specific type of emails in your inbox.
If you ever need to modify or delete the alerts, go to ‘Rules’ in the ‘Home’ tab at the top ribbon and then to “manage rules and alerts.” Here, all previously created rules will be shown and you can edit and delete them if you want.

Please note that the desktop alerts, sounds, and other types of alerts and notifications are heavily dependent on your devices and platforms and device-related settings as well. They are also dependent on what activity was going on when the new email arrived. For instance, Windows 10 has an “focus assist” feature that turns off notifications when some app is in full screen or some other activity is going on, so as to not disturb you. These settings can also be modified and changed according to ones’ needs. But it is important to keep in mind that alerts and notifications from Outlook can still get in the background of all the other stuff that you might be doing at the time.
This ensures that you will never miss the emails that you think are important and are also time-sensitive. You will be alerted and notified as soon as the emails are received, so you can take the appropriate action promptly to stay on top of the things. We hope the tutorial above has helped in creating rules in Outlook in Windows.