
Sending attachments with an email has become the standard way to share a file. Emails were at one time a simple way to send a text message but, over time, the technology and the collective users’ habit has evolved into much more. Now emails are used to send highly formatted messages using images, graphs, and more. But the most influential of them all is the ability to share complete files as attachments. These files are not embedded within an email (like a photo) but are attached with the emails that the receiver can download.
Any user of email today knows what these attachments are and the chances are that he or she has certainly used them a dozen of times.
How to Attach files to an email in Outlook
- Standard Way of Attaching Files
- CTRL+C and CTRL+V
- Windows ‘Send to’ option
- Drag and drop to attach files
Today, we are going to be discussing several ways to attach files to an email while using Outlook as a desktop email client in Windows. Keep in mind that these methods don’t necessarily apply to all email clients and definitely not for web-based clients like Gmail.
You can pick the one that fits your needs, and if you are heavy email user, you will certainly find a significant increase in your efficiency and productivity when it comes to emailing habits.
Standard Way of Attaching Files
The first one is pretty standard and applies to all sorts of email clients.
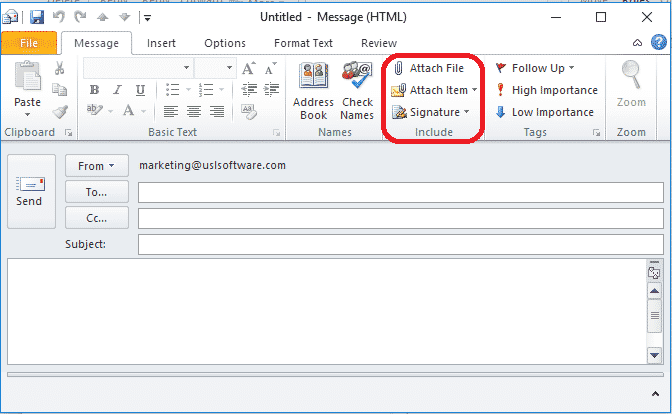
You simply create a new email and click on “Attach Files” option. In Outlook, you can click on “New Email” button in the “Home” tab at the top bar or alternatively, press CTRL+N to bring up the new email window. To attach files, click on ‘Attach File inside the ‘Include’ tab. Either choose a web-location or your PC location.
If you choose a file from a web-location (like OneDrive), you have an option to either share the link with the receiver or the file itself. If you choose the latter option, Outlook will have to download the file first and then attach it with the email the regular way.
Note: Sharing OneDrive link rather than an actual copy of the file has become an efficient way of sharing the information, especially if you are in a collaborative team. Because then all the recipients can also make changes to that file in Onedrive in real time.
CTRL + C and CTRL + V
You obviously know what the above shortcuts keys’ functions are. They are for copying and pasting data respectively. Conveniently, you can also choose these keys to attach files to an email. It is the quickest and the most efficient way to send an email with the attachments, and the one that I use most frequently.
Basically, you just copy the file you want to send and then paste it inside Outlook. Make sure your “Mail” tab is selected, rather than Calendar or Tasks Tab. Pasting a file inside Outlook automatically opens up a new Windows for creating a new email with the file already attached. Everything else remains blank, like the body of the email, subject line, and recipients (To, Cc, Bcc).
Although, if you are just sharing one file, Outlook will automatically pick up its name along with the file extension (like .doc, .txt, .xlsx, etc.) and include that as the subject of your email. If it is more than one file, Outlook leaves the subject field blank for you to enter it manually.
Windows’ “Send To” Option
If you have been the Windows user for a long time, you are most likely familiar with the “Send to” option. Commonly, it is used to send/copy files to other locations, like Desktop or any external drive. This option doesn’t “move” files from the original location but rather copies them.
So, whichever file you want to send as an attachment, just right-click on it, select “Send To” and choose “Mail Recipient.” You need to set Outlook as your default email client in Windows before this method to work, otherwise, Windows will pick up whatever else program you have specified as default.

Doing this leads to Outlook creating a new email with the said file as attachment. But this method has few distinctions than other methods to attach a file. Most importantly, it will automatically use the names of all the files as the subject of your email. separated by commas. Moreover, you will get a few lines of text into your email body including the names of the files and a simple warning about viruses and an advice to check your security settings.
This method is particularly beneficial for those who have to share multiple files and mention in the email the names of those files. If you are in the same camp, you don’t have to manually type the names yourselves, but you do have to manually delete the unnecessary text that Outlook automatically adds in the email body.
Drag and Drop to Attach Files
As you may have noticed, some of these ways to attach the files in an email in Outlook are no different than the standard practice of copying/pasting files in the Windows environment by default. You can use the CTRL+C/V or “Sent to” approach to your files in general, and to attach files to an email as well.
Then, it becomes likely that drag and drop method will also work. Like you can drag a file from one folder and drop it to the other will allow you to “Move” the file, you can also drag/drop to Outlook to create a new email with that particular file as an attachment.
Though, when dropping the file to Outlook interface, the file isn’t moved from its original location, unlike the typical Windows operation of drag and drop where the file will be “deleted” after it is moved to a different location.
This option leaves the subject and email body blank, unless there’s just one file you dragged and dropped, in which case, the subject will be the name of your file.
Hopefully, one or more of these four methods above will help you increase your speed while sending emails with attachments. The standard method (the first one in the list above) is often used the most by common users, but if you need to send a lot of emails and frequently you need to attach files with them, you can improve your productivity by adopting one of the more advanced methods of attaching files as explained above.