
A Detailed Guide How to Setup Automatic Replies in Outlook to Make Your Life a Little Bit Easier. Here is the tutorial for you.
How to Setup Automatic Replies in Outlook
Often, we are not available to reply to an email. Either we are away on a vacation or we are just out of office.
In such cases, it can be quite efficient to setup an automatic reply system on your Outlook client that can reply your pre-written message to the incoming emails. Leaving a bunch of non-replied emails can be exhausting and doesn’t reflect well on your part, especially in work environment. There’s no AI system YET that can reply coherently and appropriately to each email after reading the contents carefully. But you can use the settings smartly to setup an acceptable automatic reply that can do the job for now.
To do this, we are going to be using Outlook’s most useful feature called “Rules and Alerts”. Here you can set certain rules that you can setup that will make your Outlook client behave according to the settings you specify. You can also add few exceptions when the client won’t follow that rule. It’s an amazing feature that can help you add many behavioral rules, like automatic response, making your work more efficient and productive.

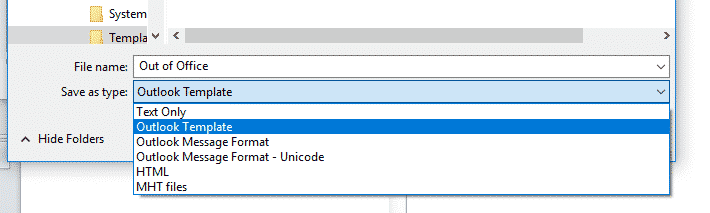
Firstly, you need to create a new email that will send out as automatic response. Simply create a new email, go to ‘File’ à Choose “Save as” à Choose “Outlook Template (*.oft)” as type. Choose the folder where you want to save the email template and click ‘Save.’ Now this is the email or email template that we are going to be using later on.
Here’s how you can add an automatic response that you just created above that will send out to a certain type of incoming emails:
Steps – How to Setup Automatic Replies in Outlook
- To start, go to ‘File’ and make sure the account for which you want to setup automatic response is selected. If not, do it manually.
- Under ‘Info’ tab, select “Manage Rules and Alerts.”
- In “Rules and Alerts” window, make sure the “Email Rules” tab is selected. Now click on “New Rule” and specify the settings as you want them to.
- Select “Apply Rule on message I receive” and click “Next”
- Now you can choose what type of emails should receive automatic replies. Commonly, it’s from certain people (like co-workers) that you want to select. You can choose from dozens of other “conditions” that you want the emails to meet in order to be selected for automatic responses. For example, you can choose if the emails have some specific words or if they are marked as “important” or “sensitive” etc.If you only want to select the emails from specific contacts, select the first option, “from people or public group.”
- Now click on “people or public group” in Step 2 at the bottom. Select the contacts and click ‘OK.’
- If you selected any other condition other than “from people or public group,” you need to specific those conditions too. For example, if you selected “with specific words in the subject,” then you need to click on “specific words” in step 2 and then type the words you want to specify.
- Now it will ask you what you want to do with the messages that meet the conditions you just specified. In the context of this article, you have to choose “reply using a specific template.”
- Now in step 2, click on the “Specific Template,” select “user templates in file system,” click on “browse” and browse to the location where you saved your custom-made template above. If there are more than one templates inside a folder, Outlook will show you all of them. Select the one you want and click on “Open” to select that template. Click “Next.”
- If you want to add any exception (cases where the client should not send the automatic response), specify them. Most helpful exception is to specify the date span under which you want to avoid automatic replies. You can choose from dozens of other conditions, like specific words in the email bodies, specific words in subject line, from specific contacts, if it is marked as important, and so on. You can also avoid adding any exception altogether and simply click on “next” to move forward.
- Specify the name for the rule, preferably “Automatic reply for March 2018.” Select if you want to run the rule on the messages already in your inbox. Check the “Turn on this rule” to turn it on. You can review the settings and rule descriptions (and make any edits if you want).
- Click “Finish” and then click “Apply” and “OK.”
Congratulations, you have now added a new rule to your Outlook. It will send automatic replies on your behalf to the specific incoming emails with the specific words that you mentioned. Except certain cases which you added as “Exceptions.”
WARNING:
Make sure to check all the rules before turning on the rule. You don’t want to send a wrong email to a wrong person. Also make sure to not including any personal or sensitive information to the email template because that is something that cannot be reversed.
Keep it simple. Don’t try to add highly sophisticated replies. Because in real world you would often want to send a well-written response to an email based on what the email said and from whom it is. Automatic responses are often setup to notify the person that you are away on vacation or for some other reason cannot reply immediately.
The most common and helpful response to add in your template is:
“Sorry, I am away on a vacation and cannot reply to your message right now. I will be back on *specify date* and will then be available to reply.”
“Rules and Alerts” feature in Outlook is very versatile, flexible, and immensely helpful, if used wisely. It can also be a reason for mis happenings, like missing important emails, sending wrong messages to wrong people, and other unwanted things.
Always double-click everything and you will be fine.