
If you want to change how often do you want Outlook to check for new emails and how often to send the mails from outbox folder, you can do that from “send and receive” feature of Outlook. It simply means when and how often Outlook “talks” to the server to sync the information; to send all the changes and to receive any new information from the serves.
Send and Receive Settings in Outlook
By default, in recent versions of Outlook, it has been set to every 30 minutes and at startup. So, when you open Outlook, it looks for new messages and then every 30 minutes. Naturally, it also downloads data whenever you add a new account.
In this article, we will discuss how you can customize the send and receive settings in Outlook that will suit your needs in a better way. For users who receive important emails on quick succession and for when users who do not need to check mails that often – both can differently customized the send and receive settings to suit their requirements more accurately.
Default and Manual Send and Receive Options in Outlook
On the top Outlook ribbon, there is a tab for “Send/Receive.” It contains all the different options and commands related to send/receive and more. See the screenshot below.

Send/Receive all folders:
If you want to manually send and receive for all the folders for all the accounts you have added in Outlook, click on this button. It will send and receive for all the folders, depending also on the specific settings of that accounts and folders.
Update Folder:
Select a folder from the left folders pane and then click this button to update this particular folder.
Send all:
If you just want to send all the unsent mail, click this button.
You can also choose to download headers, or mark/unmark messages to download, or manually process all the marked headers to download the contents of those mails.
Customize Your Own Send and receive groups
In Outlook, you can create your own send and receive groups for specific accounts and folders. By default, there is a group for “all accounts” and for inboxes and to download headers for each account.

To create your own send/receive group,
- click on ‘Define send/receive groups.” Here, you can see the default group “All Accounts.”
- To add your own, click on “New.”

- Give it a name, such as “for account 1,”
- Select the accounts from the left and set the options for it on the right. Note that the settings for IMAP, POP, and Exchange accounts will be slightly different.

- After you have selected the accounts and the folders for which this send/receive group will work, click on “OK” to close the Window.
- From the main ‘Send/receive group’ dialog box, you can specify if you want the group to be included in the f9 shortcut for send/receive. Here, you can specify how often do you want this send/receive group to run. Enter the number of minutes in the field to specify the schedule.


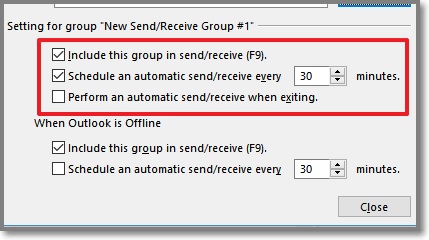
You can also specify different schedule for when Outlook is online and offline.
We hope the above article has helped in understanding send and receive settings in Outlook better and now you can create your own customized groups and schedule them to your own needs. For instance, if you want to check for email every few minutes, you can change the default 30 minutes to every 5 minutes or even less.